Hi Guy's,
If you remember correctly I had previosuly created two posts showing Office 2007 Applications producing Monte Carlo risk simulations by using Application task panes and adhering to the Office 2007 fluent ribbon standards laid down my Microsoft.
I had to remove this screen casts due to popfly shutting down, so I want to blogg a little about what I have just finished for a Large scale energies and financial BI system here in Norway.
We have SQL Server Analysis, SharePoint, Excel Services, Performance Point and Oracle. Were using a combination of WCF and Web Services to communicate information. We are using Web Applications archeiecture and Office 2007 clients for UI Elements.
Our development enviroment is DB (SQL/PLSQL), .NET 3.5, WPF/Silverlight, oXML, VBA, VSTO, SharePoint API/WebServices.
More coming soon...
lørdag 17. oktober 2009
onsdag 7. oktober 2009
OCR SharePoint Style
Hi Folks,
How about a Workflow in SharePoint with built in OCR (Opitcal Character Recognition)?
There are a few solutions that provide this but after doing a little research I realised that the Office 2007 applications come with OCR scanning OOB. So I went in search of coding against this office component.
Turns out that a nice little NameSpace (using .NET of course) allows you to minipulate OCR on images. You must have Office 2007 client installed on the Server, so this is one draw back but then again I believe considering the amount you save its worth it.
So we start of by creating a SharePoint Worfklow in (STATE MACHINE/SEQUENTIAL) Visual Studio 2008, Associate it to the correct lists, add some actions and then when you get to your OCR scanning code part reference the following DLL's:
DocumentFormet.OpenXML - This one is from the OpenXML SDK from Microsoft.
MODI - This one is from Office 2003/7 Scanning software.
Add the following using statements:
using DocumentFormat.OpenXml.Packaging;
using DocumentFormat.OpenXml;
Add a Class wide variable:
MODI.Document md;
* If you dont have MODI available its becuase you probably didnt install it when configuring the installation of Office. If you need to goto Control pannel > add/remove programs > Office 2007 > Change then right click the Scanning software and select "intall now" option (not on "install on first time ran"!)
Bellow is a function that will allow you to perform OCR on a TIFF.
private void OCR(String Name)
{
md.Create(Name);
md.OCR(MODI.MiLanguages.miLANG_NORWEGIAN, true, true);
string strText = String.Empty;
MODI.Image image = (MODI.Image)md.Images[0];
MODI.Layout layout = image.Layout;
for (int i = 0; i < layout.Words.Count; i++)
{
MODI.Word word = (MODI.Word)layout.Words[i];
if (strText.Length > 0)
{
strText += " ";
}
strText += word.Text;
}
md.Close(false);
// do something with the Words here...
}
Update soon,....
onsdag 22. juli 2009
Multi-Touch SharePoint Document Management System
Hi Guys,
Apologies, I've got a few updates to do... Ive been busy with some projects recently. Of which one of them I am extremely proud to unveil. I have been working on a multi-touch sufrace similar to that of Microsofts but at much reduced price.
For example check out this youtube video (I will be posting all the screencasts and pics up later next month), but this will give you the idea.
So I set forth and build one of these multi-touch PC's as the Maximum guys above have shown. However I didnt want to build new applications in Action Script and Flash, although it was cool just to play around with the samples that can be found open source in flash.
So I downloaded WPF 4.0 CTP and Visual Studio 2010 with Windows 7 also. Becuase Windows 7 has an API for 2 finger touch (I will explain what that means in a minute) and WPF 4.0 natively also it meant that I could start building my application very quickly.
For example and this is the really cool part... In WPF 4.0 we have methods dedicated to Touch. For example, the onfingerdown method...
On hold, sorry guys, but a client has asked that I keep this back for a while before release all the screen shots etc... Will be here soon as possible, if you want any guidence please just ask.
Apologies, I've got a few updates to do... Ive been busy with some projects recently. Of which one of them I am extremely proud to unveil. I have been working on a multi-touch sufrace similar to that of Microsofts but at much reduced price.
For example check out this youtube video (I will be posting all the screencasts and pics up later next month), but this will give you the idea.
Maximum PC's Multitouch Surface Computer from Maximum PC on Vimeo.
So I set forth and build one of these multi-touch PC's as the Maximum guys above have shown. However I didnt want to build new applications in Action Script and Flash, although it was cool just to play around with the samples that can be found open source in flash.
So I downloaded WPF 4.0 CTP and Visual Studio 2010 with Windows 7 also. Becuase Windows 7 has an API for 2 finger touch (I will explain what that means in a minute) and WPF 4.0 natively also it meant that I could start building my application very quickly.
For example and this is the really cool part... In WPF 4.0 we have methods dedicated to Touch. For example, the onfingerdown method...
On hold, sorry guys, but a client has asked that I keep this back for a while before release all the screen shots etc... Will be here soon as possible, if you want any guidence please just ask.
mandag 20. juli 2009
Dynamics AX 4.0 - MOSS 2007 Intergration
I've been away for while working on some really good WPF Sharepoint & Office Apps that will be put up later on.
This article will be in a series of articles talking about how to Develop and deploy Microsoft Dynamics Axapt 4.0 with MOSS 2007 Intergration.
Business Requirement:
Dyanmics AX 4.0 Information in federated combined MOSS 2007 search. Document handling through MOSS 2007 (Work flow, ECM (CHECKIN/OUT), Office 2007 pane intergration using WPF for PDF preview from axapta 4.0 and more..)
Things to keep in mind:
Dynamics AX 4.0 is build NOT UPON .NET!!! This is very important when designing your systems, you will need to have something called the BDC (Not MOSS BDC) But the Business Data Connector. This will be explained in more detail.
You will also need to have the Dynamics AX Enterprise portal templates, webparts and Site template defintitions. I have create adoc versions of these but my recommendations are that you use the installer found on the Dynamics AX setup disc.
Update coming soon....
onsdag 22. april 2009
Calendar List - editing the display headings.
Calendar List - editing the display headings.
Problem:
When creating a Calendar list in SharePoint you cannot edit the displayed columns. For example if I want to display the "created by" in the title along with the Description it isn’t possible with the base definition out-of-box from this list view.
Solution:
Ok, this part isn’t one of my more glorious moments but here you go. To add this functionality simply add another Calendar view to your Calendar???? - Yes this really works, to be able to edit the display data on the Calendar view you have to add another Calendar view then modify its properties. Simply click
1. In this Calendar list click Views, create view give it some details. Set this to your default if you wish.
2. Then click views modify this view then you can add additional information to the title etc...
Thanks
James
tirsdag 17. mars 2009
Sharepoint Timer Job - Records Management
Cooming soon....Sharepoint Timer Job - Records Management MOSS
Business Case:
I have a few lists that contain documents items etc... These items needed to be sent to the Records Center when they are over 30 days old. I looked at using a workflow but this didnt fit the solution, So i created a sharepoint timer job that would poll the lists I choose, check for created date and then send the to the Archive center.
From the Archive Center I have set records routing based upon metadata (not just content type).
søndag 15. mars 2009
Sharepoint Archive Centre Problem - Host header
Hi guys,
Quick one here, if you have any problems with your farm deployment of MOSS in regards to deployment of the archive center, make sure you ensure your host header information is updated.
For example located your hosts.txt file (sometimes host.txt) add the IP and the Host header name for the portal dployment. You might have to do this for serval servers in the farm but its not a huge problem.
James
tirsdag 24. februar 2009
Create Sharepoint WebPart Pages Programatically
Create Sharepoint WebPart Pages Programatically:
Ok so if anyone has wanted to create SharePoint 2007 webpart pages programatically would have probably come up against a few challenges.
Business Case:
A Windows service would create new dashboard pages and add Excel Web Access Web Parts to the page.
Step 1 - Create a Web Part page Programatically.
Open Visual Studio (Im using 2008) and create a console application.
Add the following references and then the corrosponding using statements bellow:
using Microsoft.SharePoint;
using Microsoft.SharePoint.Publishing;
using Microsoft.SharePoint.Administration;
Add the following code (I constucted this as public methods so I called call them from a test project but up to you)
public void FillPublishingWebWithPages(string publishingSiteCollection, int pagesToCreate)
{
string Page = null;
string ZoneID = null; ;
string workbookURI = null;
SPSite SiteCollection = null;
SPWeb site = null;
PublishingSite publishingSite = null;
PublishingWeb publishingWeb = null;
try
{
// get the PublishingWeb
SiteCollection = new SPSite(publishingSiteCollection);
site = SiteCollection.RootWeb;
publishingSite = new PublishingSite(SiteCollection);
publishingWeb = PublishingWeb.GetPublishingWeb(site);
// Article Page content type
//SPContentTypeId articleContentTypeID = new SPContentTypeId("0x010100C568DB52D9D0A14D9B2FDCC96666E9F2007948130EC3DB064584E219954237AF3900242457EFB8B24247815D688C526CD44D");
SPContentTypeId articleContentTypeID = new SPContentTypeId("0x010100C568DB52D9D0A14D9B2FDCC96666E9F2007948130EC3DB064584E219954237AF390064DEA0F50FC8C147B0B6EA0636C4A7D4");
// get the ArticleLeft.aspx Page Layout
PageLayout[] layouts = publishingWeb.GetAvailablePageLayouts(articleContentTypeID);
Console.WriteLine(layouts[1]);
PageLayout articlePageLayout = layouts[1];
// create a temp name...
string pageName = DateTime.Now.ToString("yyyyMMdd-HHmmss");
// create the specified number of pages
for (int i = 0; i < pagesToCreate; i++)
{
//Page = publishingWeb.GetPublishingPages().Add(string.Format("{0}_Aldersfordelt_{1}.aspx", pageName, i), articlePageLayout).ToString();
PublishingPage newPage = publishingWeb.GetPublishingPages().Add(string.Format("{0}_Aldersfordelt_{1}.aspx", pageName, i),articlePageLayout);
newPage.Update();
}
}
catch (Exception ex)
{
throw new Exception(ex.Message);
}
finally
{
// properly dispose of the resources
site.Dispose();
SiteCollection.RootWeb.Dispose();
SiteCollection.Dispose();
}
workbookURI = "http://mossutv1/Rapports/Aldersfordelt/Aldersfordelt%2023.11.2008%20(2008-11-30%2000_50_53).xlsx";
ZoneID = "1";
AddEWAWebPart ae = new AddEWAWebPart();
Page = "http://mossutv1:88/Pages/20090224-140052_Aldersfordelt_0.aspx";
ae.Prepare(Page, workbookURI, ZoneID);
}
Ovbiously you will have to change the Page, WorkBookURI, ZoneID and URL headings etc....
Step 2: Create the Class for the AddEWAWebPart method prepare you see above.
Ok so this is simple, just right create a class ("I called mine AddEWAWebPart") then create a public method or private which ever you are working with. And use the code found from Microsoft on this link.
http://msdn.microsoft.com/en-us/library/bb871637.aspx
Remember that your not using a console app, so you will have to collect the parameters as I have send to the prepare method above.
Any help just let me know.
James Bruiners
torsdag 29. januar 2009
Preview of Risk Anlaysis (Monte Carlo & Historic) using Excel 2007 in the Elite 3 Framework.
<br/><a href="http://video.msn.com/video.aspx?vid=d71bc86d-bf99-4c4c-89e9-8f271d5195f1" target="_new" title="Elite 3 - Aldersfordelt Report Risk analysis">Video: Elite 3 - Aldersfordelt Report Risk analysis</a>
Excel Web Parts (Without MOSS/Excel Services)
Get Full Excel 2007 web part access without Excel Services.
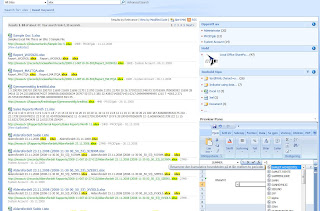
Plus learn how to create your own preview pane from search results.
Business Case:
Using SharePoint to indexing oracle, exchange server, file store, sharepoint areas proves really useful, further more searching on the material is superb. However one area that I noted was that as the search results grow so did the time it took a user to locate the correct document. Especially if they were having to open and close mutiple documents, websites, lists etc...
The preview pane is a webpart that again uses the CEWP, IFRAME, REGISTERY settings to display (on mouse over in mycase) the search result.
 So....
After following on from the last blog about previewing office documents I though i would show you a nifty way of doing this from a Search Result. I am using MOSS Enterprise here hence the search results pages are looking like they came from a Enterprise tempalte (becuase they did)... But you can easily modify this to work with WSS 3.0 or MOSS standard.
What you can see above is a search result (with some additional webparts for filtering...Facted Search on codeplex if you want) then Ive added a content editor webpart which emulates a IFRAME.
To finish it all of we simply edit the XSLT to send a row of data (i.e the path) to the Iframe. In between this we must edit the registery to accept these things.
Add the following to the a href link parameters:
onmouseover="window.open('{$url}','myframe')"
In the above case it will react to the mouse over event, but if you dont want that then just omitt.
Copy the XSLT from your editor, then past it back into the Core Results webpart XSLT.
Part 3:
Add the content editor webpart to your search results page (I prefer in the right webpart zone) and you probably want to give it a fixed width and height.
Add a IFRAME Snippt named "myframe" (same as XSLT above ref essentially) to a CEWP.
See bellow in previous blogg if your not sure how to add a IFRAME to the CEWP.
Then perform a search results hover over the title and it will load it in side your webpart previewer.
With Excel, Word you will get full ribbon control so on so forth....So you can take this principle and use it for Excel Web Access should you want to.
Thanks
James Bruiners
Plus learn how to create your own preview pane from search results.
Business Case:
Using SharePoint to indexing oracle, exchange server, file store, sharepoint areas proves really useful, further more searching on the material is superb. However one area that I noted was that as the search results grow so did the time it took a user to locate the correct document. Especially if they were having to open and close mutiple documents, websites, lists etc...
The preview pane is a webpart that again uses the CEWP, IFRAME, REGISTERY settings to display (on mouse over in mycase) the search result.
 So....
After following on from the last blog about previewing office documents I though i would show you a nifty way of doing this from a Search Result. I am using MOSS Enterprise here hence the search results pages are looking like they came from a Enterprise tempalte (becuase they did)... But you can easily modify this to work with WSS 3.0 or MOSS standard.
What you can see above is a search result (with some additional webparts for filtering...Facted Search on codeplex if you want) then Ive added a content editor webpart which emulates a IFRAME.
To finish it all of we simply edit the XSLT to send a row of data (i.e the path) to the Iframe. In between this we must edit the registery to accept these things.
Part 1:
Open notepad and past the following into it.
Windows Registry Editor Version 5.00[HKEY_LOCAL_MACHINE\SOFTWARE\Classes\Word.Document.8]"BrowserFlags"=dword:80000024[HKEY_LOCAL_MACHINE\SOFTWARE\Classes\Word.RTF.8]"BrowserFlags"=dword:80000024[HKEY_LOCAL_MACHINE\SOFTWARE\Classes\Word.Document.12]"BrowserFlags"=dword:80000024[HKEY_LOCAL_MACHINE\SOFTWARE\Classes\Word.DocumentMacroEnabled.12]"BrowserFlags"=dword:80000024[HKEY_LOCAL_MACHINE\SOFTWARE\Classes\Excel.Sheet.8]"BrowserFlags"=dword:80000A00[HKEY_LOCAL_MACHINE\SOFTWARE\Classes\Excel.Sheet.12]"BrowserFlags"=dword:80000A00[HKEY_LOCAL_MACHINE\SOFTWARE\Classes\Excel.SheetMacroEnabled.12]"BrowserFlags"=dword:80000A00[HKEY_LOCAL_MACHINE\SOFTWARE\Classes\Excel.SheetBinaryMacroEnabled.12]"BrowserFlags"=dword:80000A00[HKEY_LOCAL_MACHINE\SOFTWARE\Classes\PowerPoint.Show.8]"BrowserFlags"=dword:800000A0[HKEY_LOCAL_MACHINE\SOFTWARE\Classes\PowerPoint.Show.12]"BrowserFlags"=dword:800000A0[HKEY_LOCAL_MACHINE\SOFTWARE\Classes\PowerPoint.ShowMacroEnabled.12]"BrowserFlags"=dword:800000A0[HKEY_LOCAL_MACHINE\SOFTWARE\Classes\PowerPoint.SlideShow.8]"BrowserFlags"=dword:800000A0[HKEY_LOCAL_MACHINE\SOFTWARE\Classes\PowerPoint.SlideShow.12]"BrowserFlags"=dword:800000A0[HKEY_LOCAL_MACHINE\SOFTWARE\Classes\PowerPoint.SlideShowMacroEnabled.12]"BrowserFlags"=dword:800000A0
Save as AnyGivenFileName.reg
* note you must consider business related needs when openning Office documents in the browser!
Then double click your newly created file and it will add the registery settings so that Office documents can be opened in the browesr (including full ribbon support! :)
Part 2: Now go over to your Sharepoint Search results page.
Edit the core results and pull up its XSLT. I prefer using Visual Studio to edit XSLT AND XML but it doesnt matter.
 Under:
Add the following to the a href link parameters:
onmouseover="window.open('{$url}','myframe')"
In the above case it will react to the mouse over event, but if you dont want that then just omitt.
Copy the XSLT from your editor, then past it back into the Core Results webpart XSLT.
Part 3:
Add the content editor webpart to your search results page (I prefer in the right webpart zone) and you probably want to give it a fixed width and height.
Add a IFRAME Snippt named "myframe" (same as XSLT above ref essentially) to a CEWP.
See bellow in previous blogg if your not sure how to add a IFRAME to the CEWP.
Then perform a search results hover over the title and it will load it in side your webpart previewer.
With Excel, Word you will get full ribbon control so on so forth....So you can take this principle and use it for Excel Web Access should you want to.
Thanks
James Bruiners
mandag 5. januar 2009
Document Viewer Webpart MOSS
Office 2007 Document Viewer WebPart (No code required)
The business case was that we had a few large lists that had documents from Office 2007. The problem was the amount of time it took to open each document then preview it in a new instance of the Office application (if you computer is having a slow day this means a lot of wasted time) and then if it was incorrect you would have to open a new one and start the whole process again.
So what if we could preview Office documents like shown bellow.
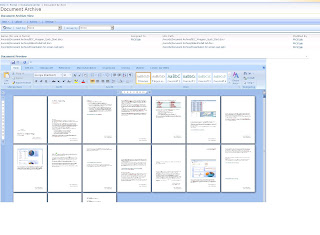
All we have here is a list and when you click one of the hyperlinks it will open the document in the preview webpart bellow :) Nice....
Step one goto your sharepoint server:
Open Explorer
Click Tools
Click Folder Options (at the bottom)
Click "File types" tab - it will then populate your file types registered on the server.
Go down to DOCX
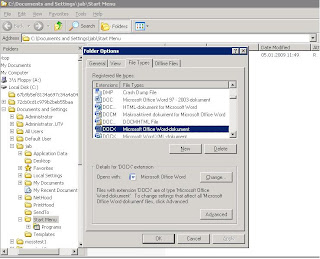
Now click the advanced button and
you will get some windows.
No select the tick box Browse in same window! Click ok a few times.
* I wouldnt recommend you play around with much of these settings especially the DDE messaging unless you really know what you are doing! But openning in same browser is ok...
Restart internet explorer.
Now create a document library you want to store you Documents into. If you already have one then you can use this, however I would recommend creating a fresh one for testing first.
Upload a few documents to the document library. In this case Word 2007 files.
Now edit the page where the document library is shown, click site settings, edit page.
 Here you can add a webpart to the page, if you want to create a seperate asp.net web part page and add the document library to that you could of course....
Add the Content editor webpart to the page. I prefere underneath.
In the source editor add the IFRAME snippet found on the image to the left.
Click apply and ok.
It you have publishing features activated the checkin any changes and exit edit mode on the page. Take a copy of the URL of the page.
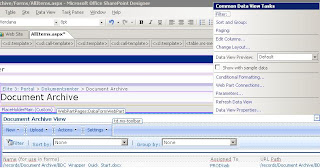
Now open SharePoint Designer and open the page which contains your list and newly added Content editor webpart with its IFRAME inside it....
We will be converting the standard list to a data view if your not sure how to do this, click insert, sharepoint controls and then select dataview, you can choose the document library of your choice, in our demo the one above.
There will be a little right arrow (small) to the top right of the data view, by the way you can easily modify the XSL here to make things like sorting, filter, grouping....but today we are more interested in changing a field type so it is a hyperlink.
To do this simply click this arrow icon and select edit Colomns, make sure you add the hyperlink field and remove any unwanted fields also.

Now select the top record (i.e the hyperlink field) in the data view we have just created. like shown bellow, there is a similar arround icon that will show:
Make sure the URL path is shown on the field, you can mask this is you want to in Java Script or indeed in XSD but here is just simply for demo purposes.
Save the page and exit SPD.
Go back to the page in SharePoint and edit the page once again. Modify the data view webpart and modify the XSL.
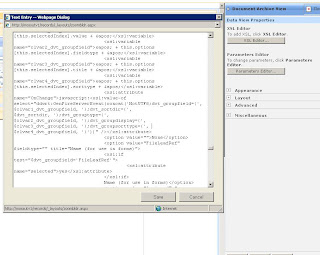
Find the XSL when test for the field type 'url'
it might look something like this.
xsl:when test="$fieldtype='url'
underneath this there should be a "a href" after the "{$fieldvalue} tr" simply add the following:
a href="{$fieldvalue} tr" target="myframe"
Now what we have is a hyperlink the will send the full url path to the IFRAME we created in the Content editor webpart.
Save, apply and ok. Then youre ready to go
James Bruiners
The business case was that we had a few large lists that had documents from Office 2007. The problem was the amount of time it took to open each document then preview it in a new instance of the Office application (if you computer is having a slow day this means a lot of wasted time) and then if it was incorrect you would have to open a new one and start the whole process again.
So what if we could preview Office documents like shown bellow.

All we have here is a list and when you click one of the hyperlinks it will open the document in the preview webpart bellow :) Nice....
Step one goto your sharepoint server:
Open Explorer
Click Tools
Click Folder Options (at the bottom)
Click "File types" tab - it will then populate your file types registered on the server.
Go down to DOCX

Now click the advanced button and
you will get some windows.
No select the tick box Browse in same window! Click ok a few times.
* I wouldnt recommend you play around with much of these settings especially the DDE messaging unless you really know what you are doing! But openning in same browser is ok...
Restart internet explorer.
Now create a document library you want to store you Documents into. If you already have one then you can use this, however I would recommend creating a fresh one for testing first.
Upload a few documents to the document library. In this case Word 2007 files.
Now edit the page where the document library is shown, click site settings, edit page.
 Here you can add a webpart to the page, if you want to create a seperate asp.net web part page and add the document library to that you could of course....
Add the Content editor webpart to the page. I prefere underneath.
In the source editor add the IFRAME snippet found on the image to the left.
Click apply and ok.
It you have publishing features activated the checkin any changes and exit edit mode on the page. Take a copy of the URL of the page.
Now open SharePoint Designer and open the page which contains your list and newly added Content editor webpart with its IFRAME inside it....
We will be converting the standard list to a data view if your not sure how to do this, click insert, sharepoint controls and then select dataview, you can choose the document library of your choice, in our demo the one above.
There will be a little right arrow (small) to the top right of the data view, by the way you can easily modify the XSL here to make things like sorting, filter, grouping....but today we are more interested in changing a field type so it is a hyperlink.
To do this simply click this arrow icon and select edit Colomns, make sure you add the hyperlink field and remove any unwanted fields also.


Now select the top record (i.e the hyperlink field) in the data view we have just created. like shown bellow, there is a similar arround icon that will show:

Make sure the URL path is shown on the field, you can mask this is you want to in Java Script or indeed in XSD but here is just simply for demo purposes.
Save the page and exit SPD.
Go back to the page in SharePoint and edit the page once again. Modify the data view webpart and modify the XSL.

Find the XSL when test for the field type 'url'
it might look something like this.
xsl:when test="$fieldtype='url'
a href="{$fieldvalue} tr" target="myframe"
Now what we have is a hyperlink the will send the full url path to the IFRAME we created in the Content editor webpart.
Save, apply and ok. Then youre ready to go
James Bruiners
Sharepoint & Office Business Application development
Happy 2009 -
My name is James Bruiners I am the Snr. Microsoft Office SharePoint Server consultant and Microsoft Office Business Applications consultant for a Norwegian energies company.
I decided to start this blog after my many development highs and lows surrounding SharePoint and Office 2007.
I will be updating a number of business case articles with sample code, video and explanation surrounding how to maximize MOSS & Office 2007.
Some of the main areas will include:
BDC Development
Enterprise Search
Content Management
SPD
Office 2007 xml
Office 2007 VBA
VSTO Application Addins
VSTO Document Level Addins
Best Practices
Web Parts
WPF/E Intergration
Forms Server & Services
InfoPath VSTO development
Excel Services
Risk Analysis
Oracle intergration with MOSS
VB6 Integrations with WSS 3.0
and so on....
So keep watching for more useful information and hints.
James
Abonner på:
Kommentarer (Atom)